Hey there, It’s been a while!
This blog has been long overdue ever since I participated on a .NET MAUI hackathon.
I want to share with you the potential of .NET MAUI and hopefully it will help jumpstart your .NET MAUI adventure.
Few questions I have before we start:
- Is it the future of app development?
- Is it mature enough to be used in a large scale application?
- How dows it differ from Xamarin?
- What platforms and devices are supported by .NET MAUI?
- Can existing Xamarin apps be easily migrated to .NET MAUI?
- Are there notable performance improvements in .NET MAUI compared to Xamarin?
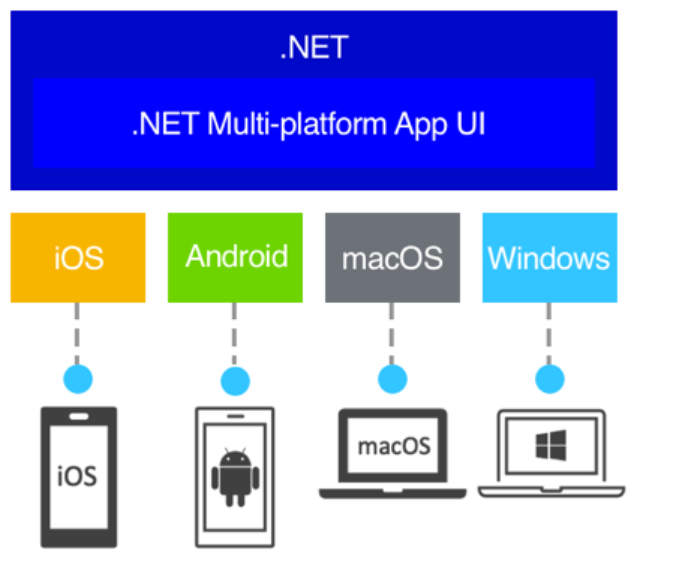
What is it?
.NET MAUI which is short for Multi-platform App UI offers a unified framework for developing applications that run seamlessly on iOS, Android, Windows, macOS.
Before we start looking into .NET MAUI, we first need to understand what cross-platform development is. Cross-platform development simply refers to the practice of creating software applications that can run on multiple platforms whether it’s web, mobile, or desktop.
If we go back into time, the traditional approach of building apps for different platform requires separate development efforts with each requiring it’s own unique code. This approach leads to increase development time, effort, maintenance, and cost.
With the advent of cross-platform frameworks like .NET MAUI, developers have been enabled to build applications that share a significant portion of the codebase which delivers native-like experiences on each platform.
Now, if you go back to the questions I have, you must be wondering why did Xamarin came into question. What does Xamarin do? and What is the relationship of Xamarin to .NET MAUI?
To give a short answer, Xamarin is also a cross-platform framework which enables developer to build applications that targets mobile platforms (IoS, Android, and Windows) using the .NET ecosystem.
.NET MAUI is the successor of Xamarin which builds upon the foundation of Xamarin.
It leverages the power of Xamarin and has been evolved by extending it further to provide a unified and improved framework for developing cross-platform apps.
.NET MAUI Architecture
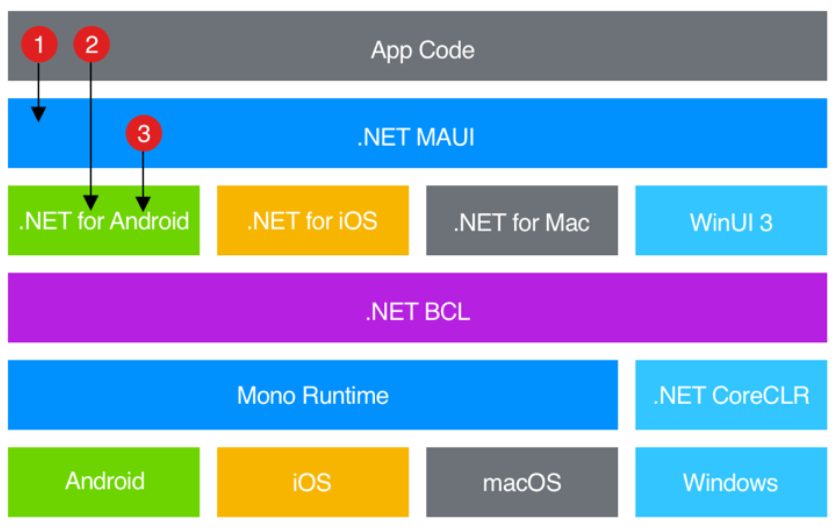
Based on the image from Microsoft’s documentation, the App Code represents the shared codebase of the application. It contains the business logic, data models, and other application-specific code that is independent of the target platforms.
Underneath .NET MAUI, there are platform-specific implementations for each target platform. These include .NET for Android, .NET for iOS, .NET for Mac, and WinUI3 for Windows.
Each implementation leverages the underlying platform-specific APIs and frameworks to provide a native-like experience.
The .NET Base Class Library (BCL) is a set of shared APIs that are available across all platforms. It provides a wide range of functionaltiy for tasks such as file I/O, networking, data manipulation, ensuring consistent behavior and code sharing across platforms.
Now, to run the .NET MAUI application, it relies on Mono Runtime or the .NET Core Common Language Runtime (CLR). The Mono Runtime is used for Android and iOS platforms, while the .NET Core CLR is used for macOS and Windows platforms.
Finally, the platform-specific runtimes, such as Android, iOS, macOS, and Windows are responsible for executing the .NET MAUI application on their respective platforms. They provide the necessary platform-services, APIS, and user interface frameworks for the application to run.
Setting up the Dev Environment
Now we know what it is and have gone through the architecture, let’s now get our hands dirty!
Steps
- Install Visual Studio 2022
- You can download it here
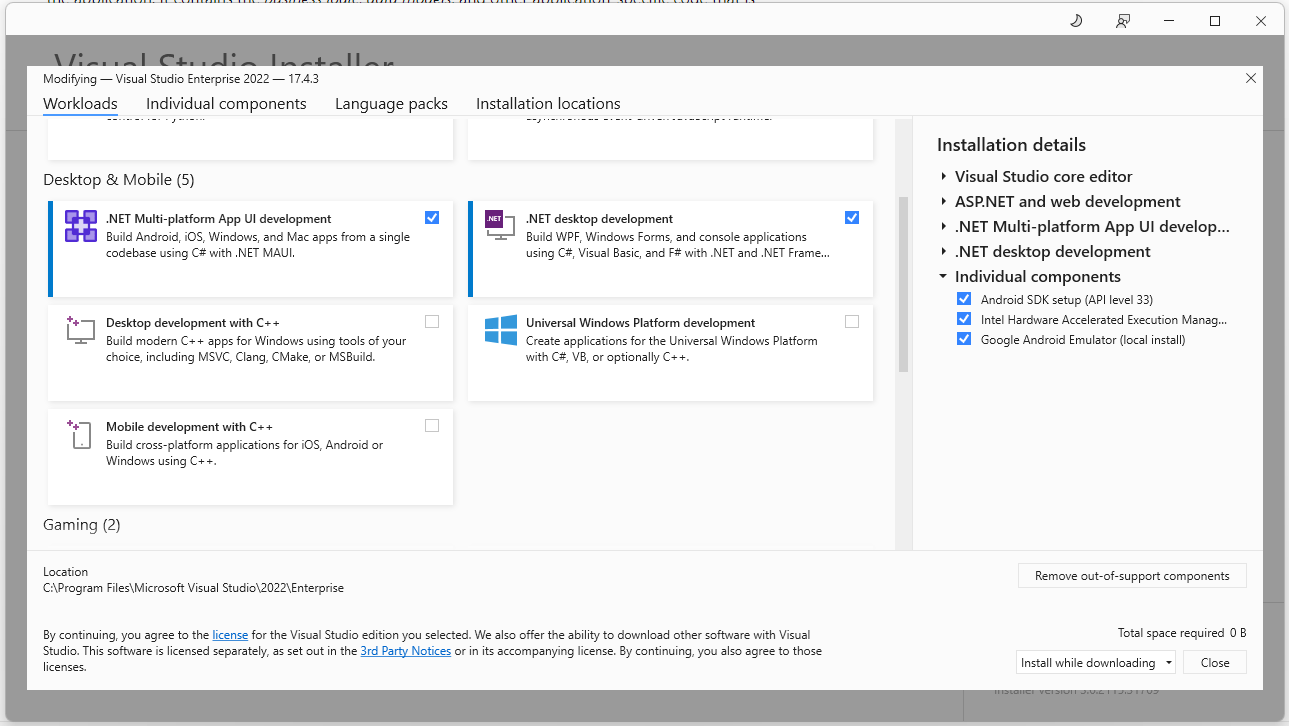
- In the Visual Studio Installer application, you need to enable the .NET Multi-Platform Application under Desktop & Mobile in the Workloads tab.
- I always prefer a full-blown IDE compared to using a text editor (vs code) but if you want to do it in vs code, that’s also possible. You just need to download the .NET MAUI Extension Pack.
- Install the Android SDK
- You can download the SDK using the Android Studio IDE here.
- Install an Android Emulator
- This can be installed in the Visual Studio Installer application.
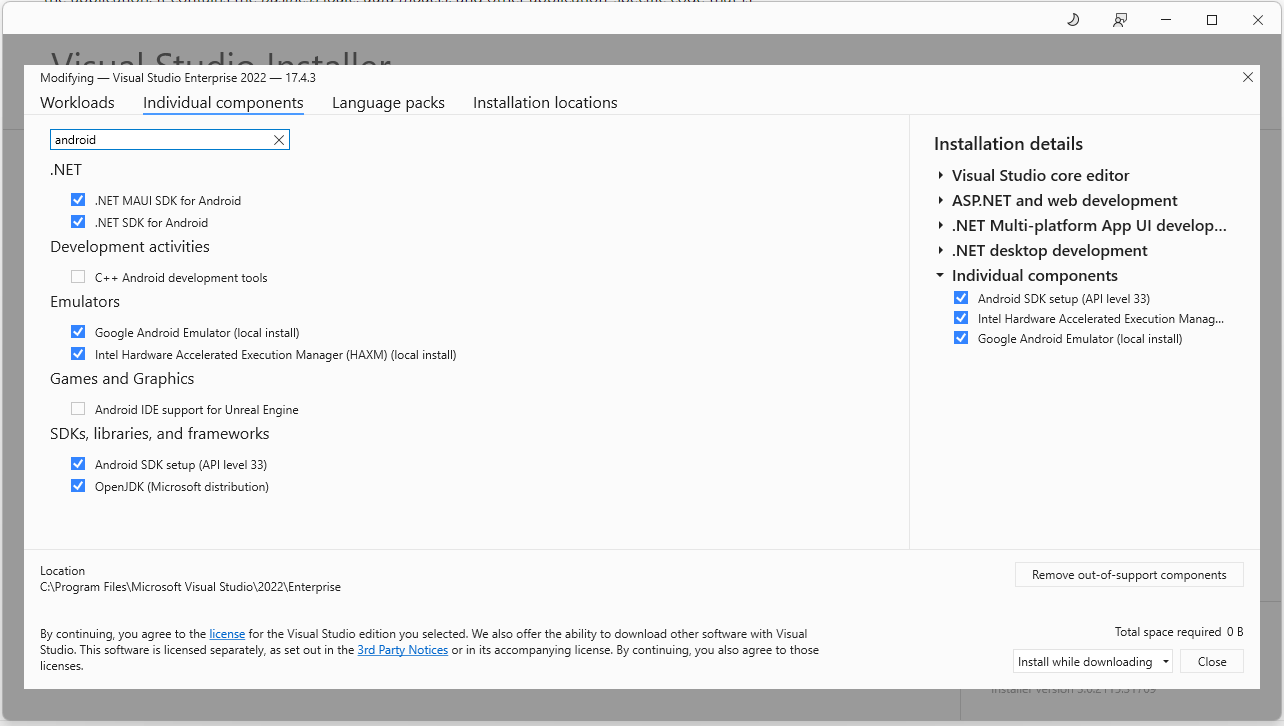
- This can be installed in the Visual Studio Installer application.
- Setup and Configure the Android Emulator
- Once installation is complete, you can launch the Android Emulator Manager in Visual Studio 2022 by navigating to tools -> Android Device Manager.
- You can add a new device and supply what you need or just the default should be fine as a starter.
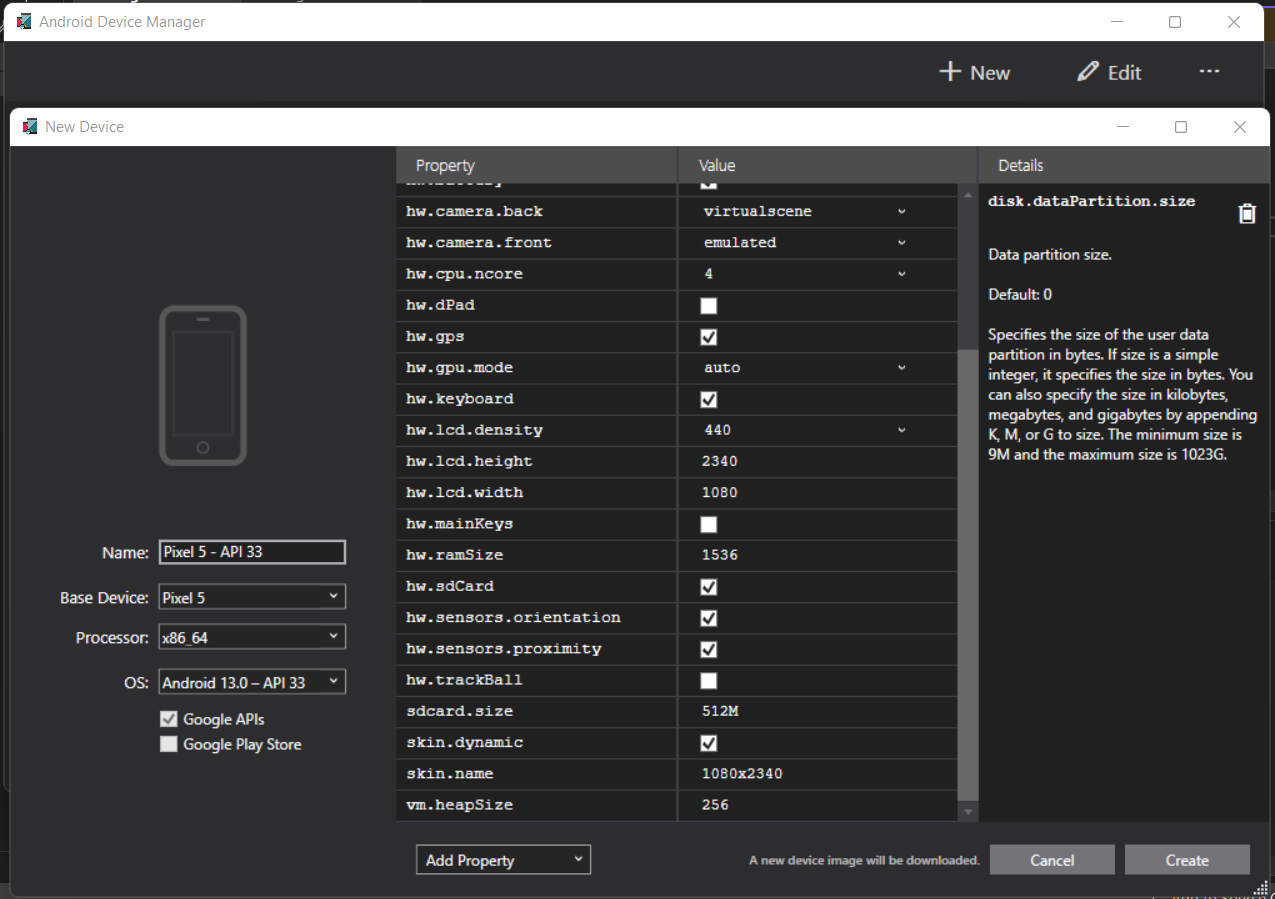
- You can add a new device and supply what you need or just the default should be fine as a starter.
- Once installation is complete, you can launch the Android Emulator Manager in Visual Studio 2022 by navigating to tools -> Android Device Manager.
Scaffolding the App
Steps
- Create a new project
- Search for .NET MAUI template
- You will see 3 options:
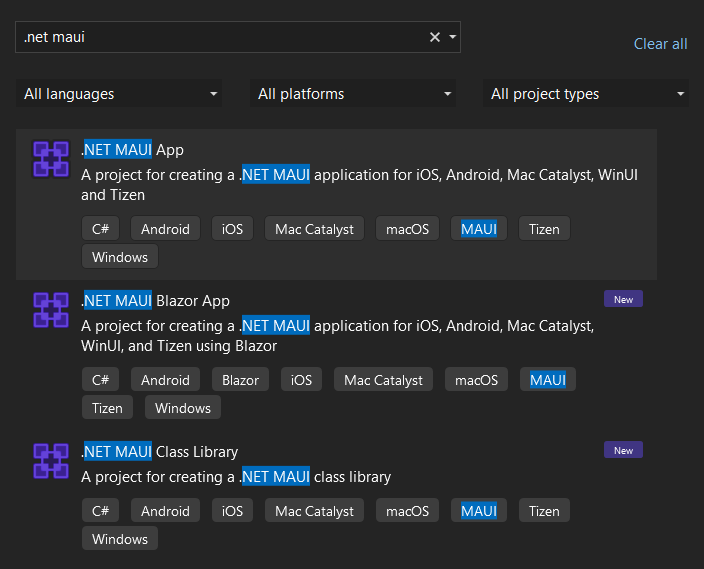
- You might be wondering the difference between the first and second option (.NET MAUI vs .NET MAUI Blazor App)
- To simplify, The .NET MAUI App template focuses on creating native mobile and desktop applications using XAML and C#, while the .NET MAUI Blazor App template enables you to build web applications that can share code with your .NET MAUI app by leveraging the Blazor framework.
- You might be wondering the difference between the first and second option (.NET MAUI vs .NET MAUI Blazor App)
- Choose a template of your choice and that’s it!
Running the App
There is no difference running the app like any other .NET app. For .NET MAUI, we can just simply specificy which platform it will run.
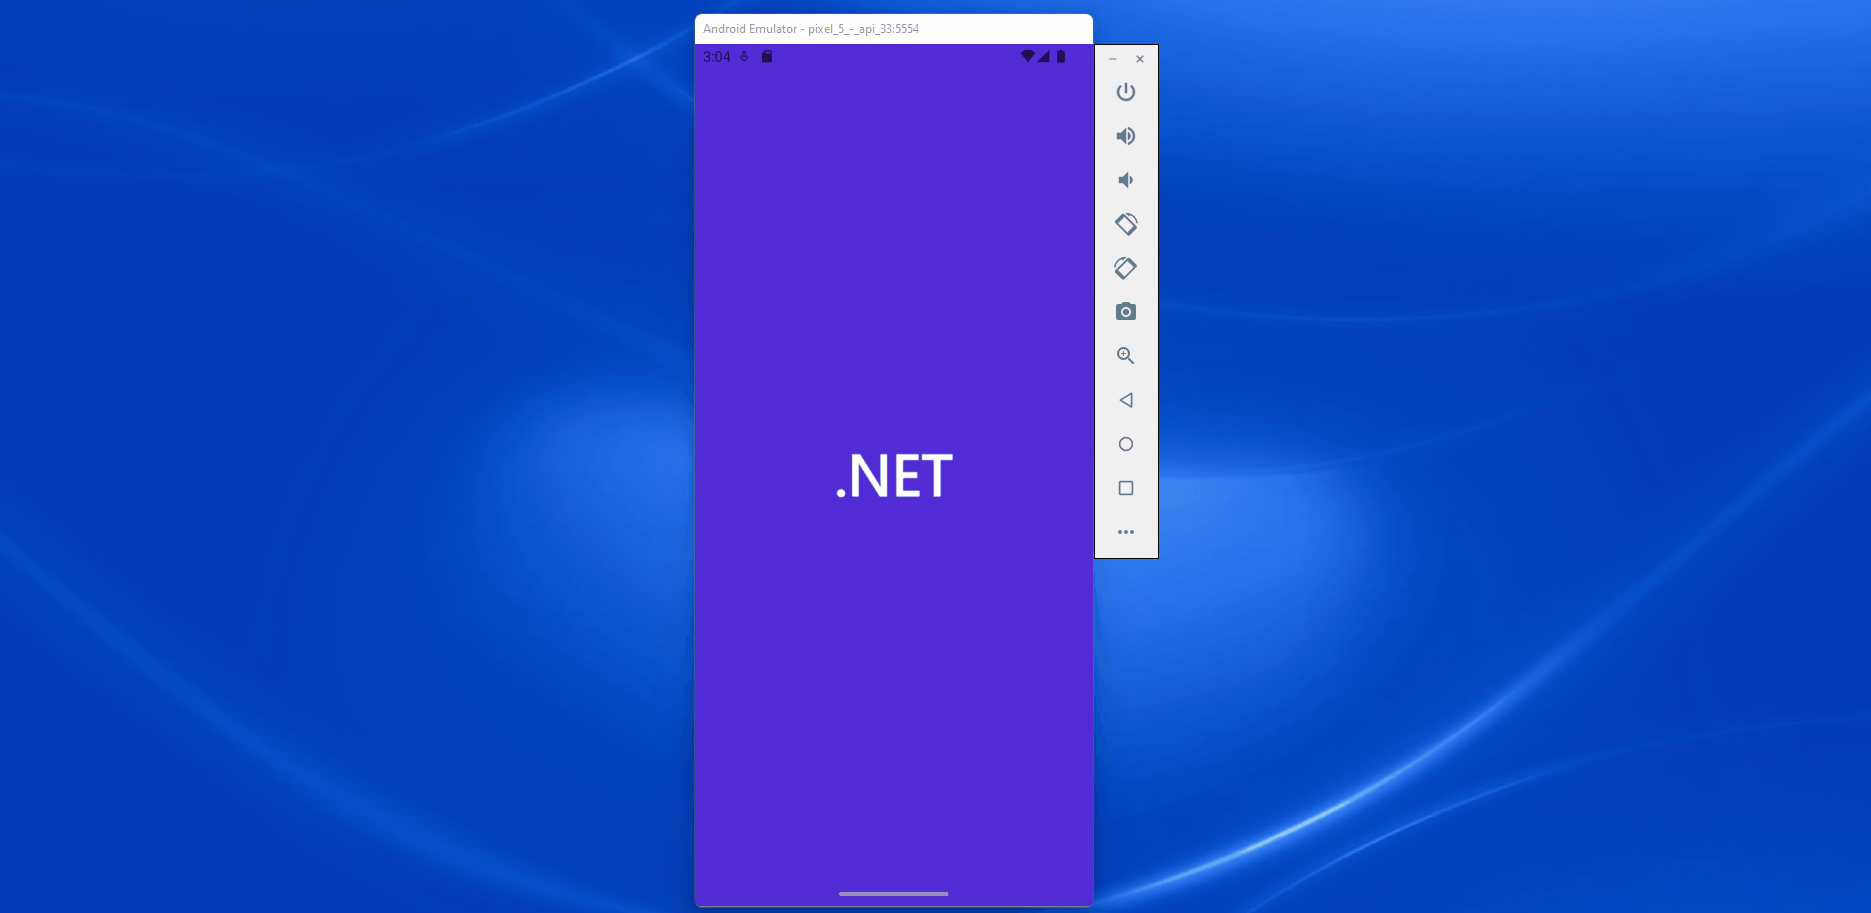
I tried running the default .NET MAUI template app on the platforms below:
The option below will show up once the android emulator has been configured

You should be getting this screen on your android emulator
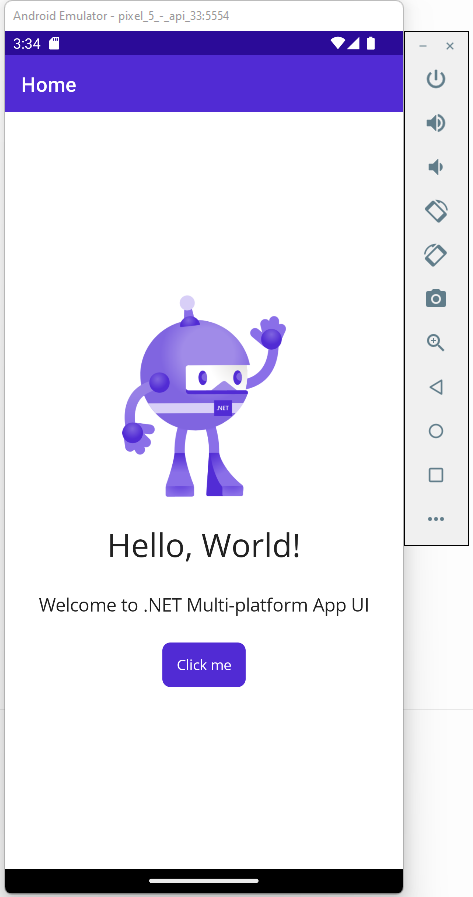
Note: Hyper-V must be enabled to accelaret the android emulator.
Lastly, running it in Windows is straight forward:

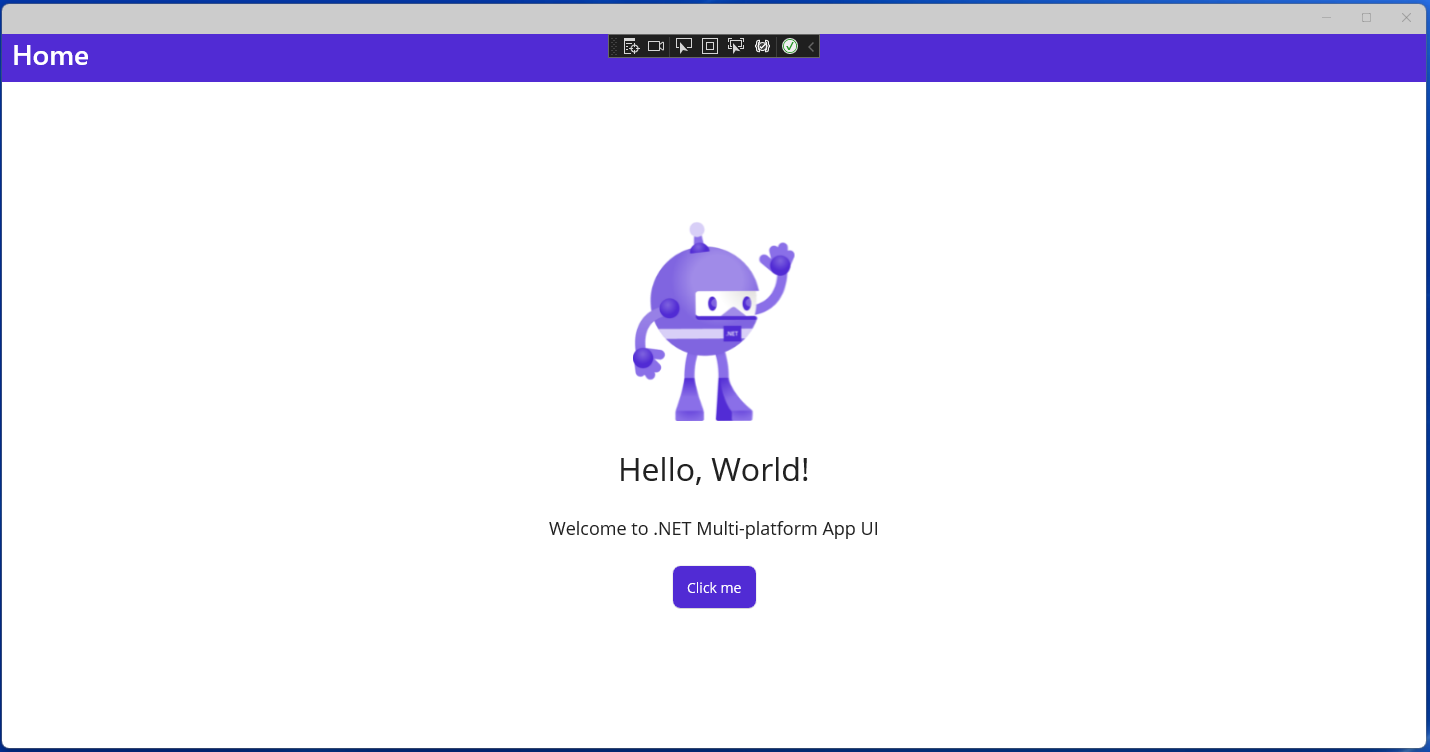
Note: Developer mode must be enabled in your OS setting to run in Windows platform.
Now, since .NET MAUI is meant for cross-platform development, how do we run it simultaneously?
Running a .NET MAUI app simultaneously on both Windows and Android platforms using the multiple startup project configuration is currently not supported in Visual Studio.
I have tried configuring the following steps:
- In your solution, go to properties
- Under Common Properties, go to Startup Project
- Change Single startup project to Multiple startup projects
- Change the Action to Start.
Unfortunately, this configuration does not work.
Under the hood, the packaging and deployment of the app to mobile (specific to android) is handled by the underlying Xamarin.Android framework. Xamarin.Android allows .NET MAUI to package the app as an Android application package (APK) file that can be installed and run on Android devices or emulators.
The only way to do this is by running another instance of your project and run the android and windows app separately which is not ideal.
Hot Reload does work though!
Let’s Create a Sample App
Exploring the default template would be a great way to start your journey, but for this blog, let’s create a messaging app!
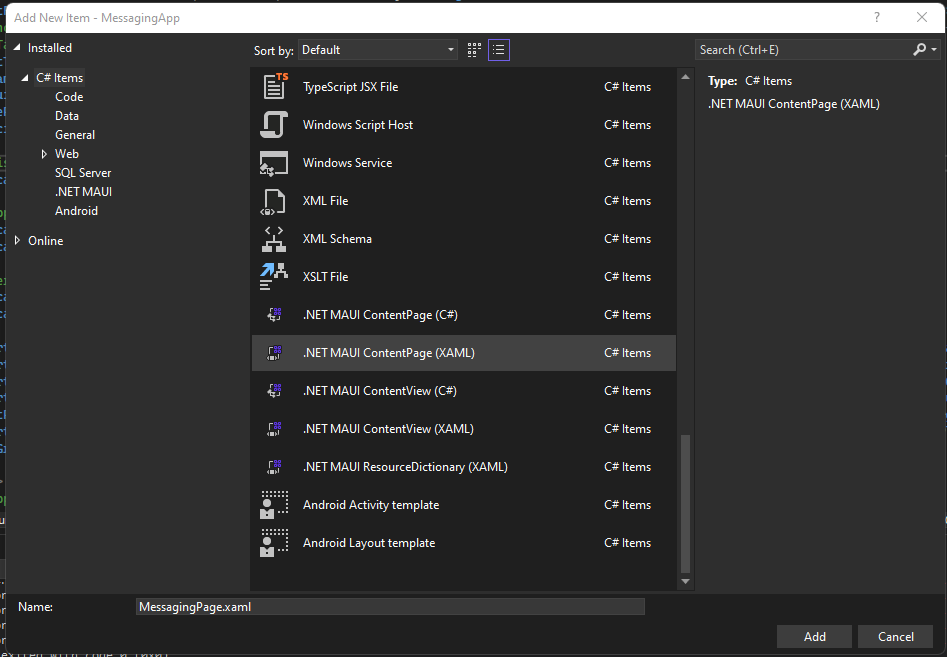
First, let’s create a new XAML file.
Just search for .NET MAUI Content Page (XAML) and name it MessagingPage
To make it simple, let’s not break the default template. We need to make this MessagingPage the MainPage.
To do this, navigate to App.xaml.cs and update the code below:
public App()
	{
        InitializeComponent();
        MainPage = new NavigationPage(new MessagingPage());
	}
Let’s now build the UI
In the MessagingPage.xaml, update the code below:
<?xml version="1.0" encoding="utf-8" ?>
<ContentPage xmlns="http://schemas.microsoft.com/dotnet/2021/maui"
             xmlns:x="http://schemas.microsoft.com/winfx/2009/xaml"
             x:Class="MessagingApp.MessagingPage">

    <StackLayout>
        <!-- Message Display Area -->
        <ScrollView>
            <StackLayout x:Name="MessageContainer" Padding="10" VerticalOptions="End">
                <StackLayout x:Name="MessageStackLayout" Orientation="Vertical" Spacing="10">
                </StackLayout>
            </StackLayout>
        </ScrollView>

        <!-- Message Input -->
        <StackLayout  Orientation="Vertical" Margin="10" VerticalOptions="Center">
            <Entry x:Name="MessageEntry" Placeholder="Type your message" />
            <Button Text="Send" Clicked="OnSendMessageClicked" />
        </StackLayout>
    </StackLayout>
</ContentPage>
Now, in the MessagingPage.xaml.cs, update the code below:
 private void OnSendMessageClicked(object sender, EventArgs e)
    {
        // Get the entered message from the MessageEntry
        string message = MessageEntry.Text;

        // Create a new StackLayout to hold the message and icon
        StackLayout messageLayout = new StackLayout
        {
            Orientation = StackOrientation.Horizontal,
            HorizontalOptions = LayoutOptions.Start,
            Spacing = 10
        };

        // Create an Image for the icon (replace "icon.png" with your icon's image source)
        Image iconImage = new Image
        {
            Source = "maui-messaging-icon.jpg",
            HeightRequest = 40,
            WidthRequest = 40,
            Aspect = Aspect.AspectFill
        };

        // Create a Frame to contain the Label with a rounded background
        Frame messageFrame = new Frame
        {
            BackgroundColor = Color.FromRgb(211, 211, 211), //Set the background color
            Padding = new Thickness(10),
            CornerRadius = 10, // Set the corner radius for a round shape
            Content = new Label
            {
                Text = message,
                HorizontalOptions = LayoutOptions.Start,
                VerticalOptions = LayoutOptions.Center
            }
        };

        // Determine the message alignment based on the even/odd index
        if (MessageStackLayout.Children.Count % 2 == 0)
        {
            // For even indexes, align the message to the right
            messageLayout.HorizontalOptions = LayoutOptions.End;
            messageLayout.Children.Add(messageFrame);
            messageLayout.Children.Add(iconImage);
        }
        else
        {
            // For odd indexes, align the message to the left
            messageLayout.Children.Add(iconImage);
            messageLayout.Children.Add(messageFrame);
        }

        // Add the messageLayout to the MessageStackLayout
        MessageStackLayout.Children.Add(messageLayout);

        // Clear the message entry
        MessageEntry.Text = string.Empty;
    }
Don’t forget to add an icon and upload in the root project directory!
Running this in Windows should look like this:

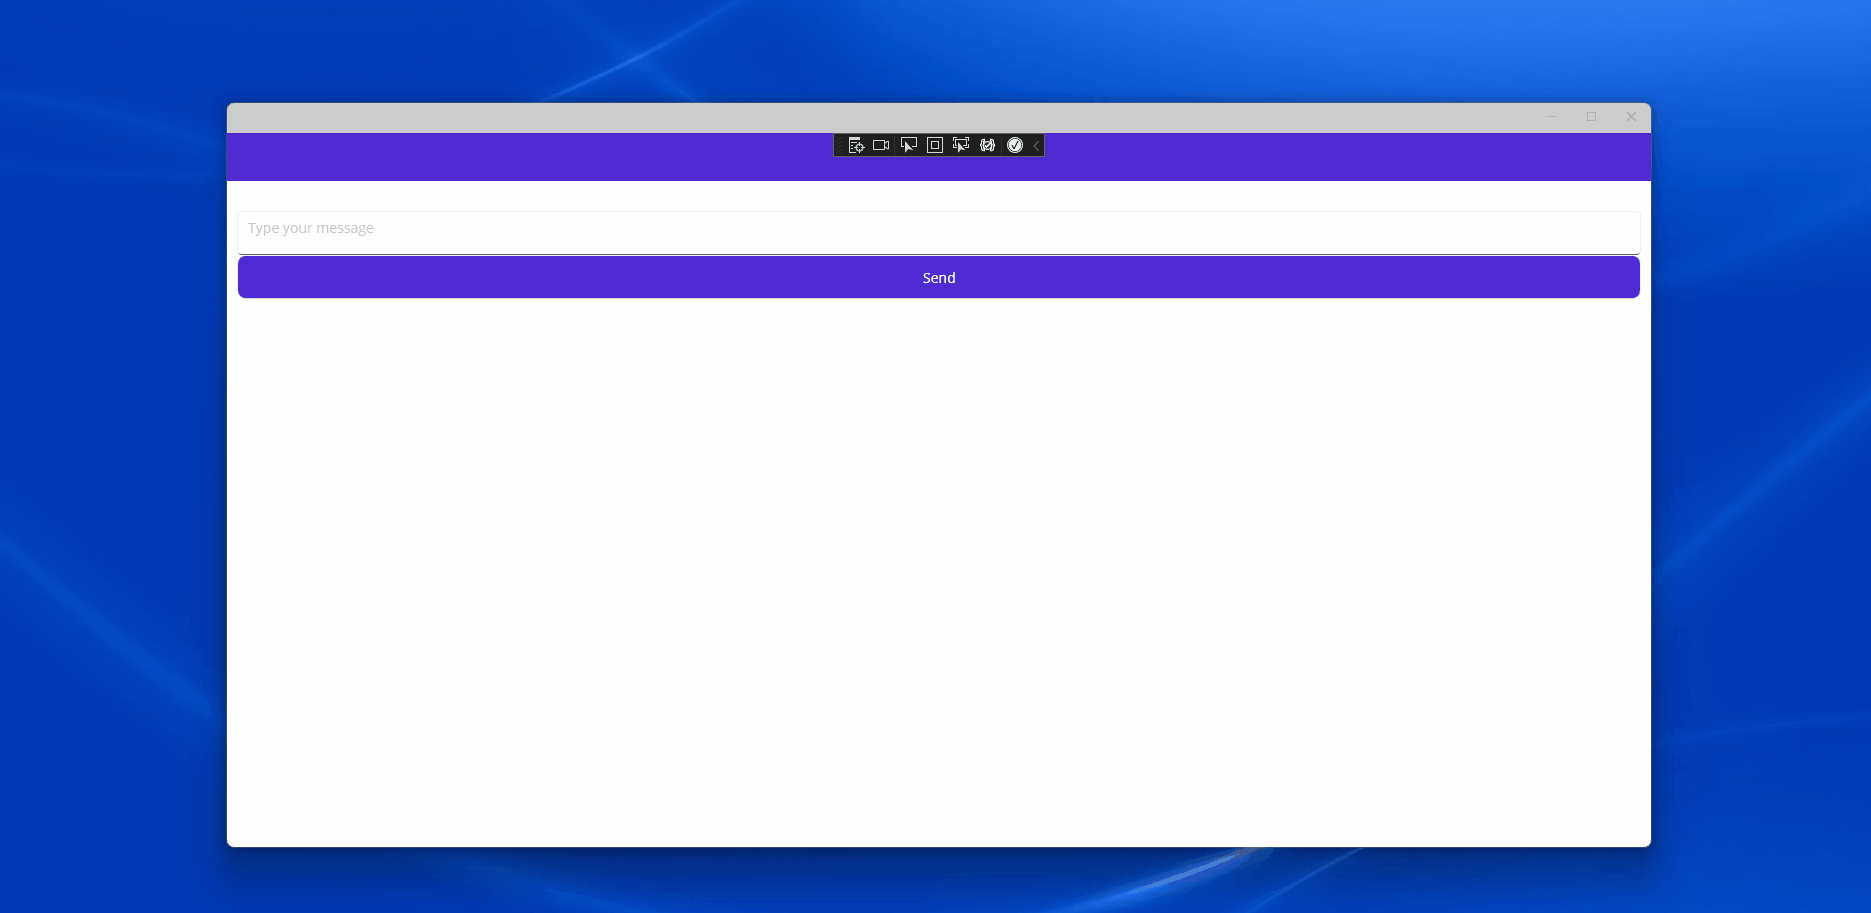
Don’t forget to update the configuration of the image.
- Go to the image properties
- In the Build Action, Update it to Embedded resource
- In the Copy to Ouput Directory, Update it to Copy always
Running this in Android should look like this:
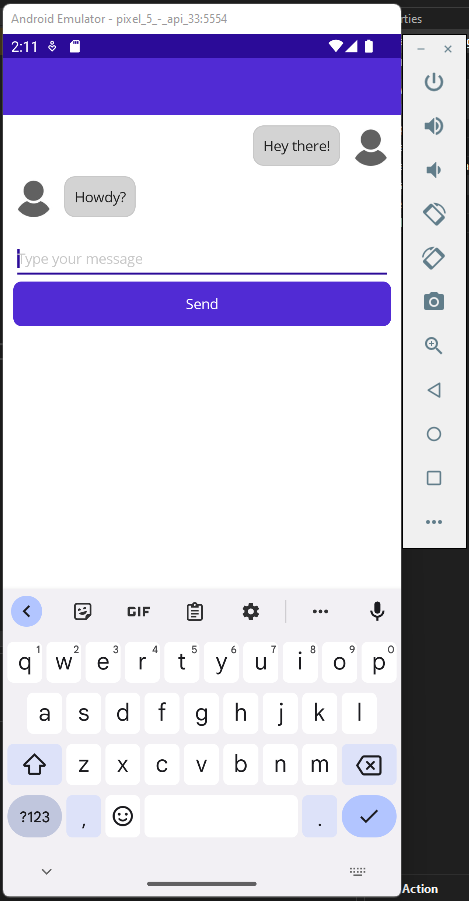
 Don’t forget to update the configuration of the image.
- Navigate to the Platforms folder
- Go to the Android folder
- Open up Resources folder
- Create a new folder and name it drawable
- By default, the Android project expects the image file to be located in the ‘Resources/drawable’ folder.
- Upload the image.
What’s next?
Unfortunately, during this time, I have run out of credits in my subscription.
In the next part, we will go through the following steps:
- Provision SignalR service in Azure
- Configure SignalR in our .NET MAUI App
- Define server-side SignalR Hub
- Implement SignalR communication in our .NET MAUI App
- Test and Debug
Stay tuned!